Skin injuries come with toddler territory ― here is how to handle junior’s cuts and scrapes with minimal tears.
![How to treat your child’s wounds at home [Infographic]](/sites/default/files/tots-how-to-treat-your-child-s-wounds-at-home-main_2.jpg)
Even the most vigilant of parents, who have child-proofed their home thoroughly, will at some point find themselves consoling a child who has skinned their elbow or sustained a gash on their forehead.
Your curious mini-explorer is discovering the world around them from every angle. So, it’s normal for them to bump into sharp edges or leap off high furniture. Coincidentally, this usually happens during the two seconds you take your eyes off them.
While you can soothe most child-related boo boos with a kiss, some backup is necessary. For starters, make sure you have a complete first-aid kit at home and stash a mini-version in your diaper bag or car for on-the-go treatment.
Next, print out the comprehensive infographic below to make sure you’re treating your tyke’s skin lacerations the right way. If you don’t handle it properly and quickly, you risk infecting the wound, which can lead to further complications.
Now, you’re all set to deal with a mishap… Good luck!
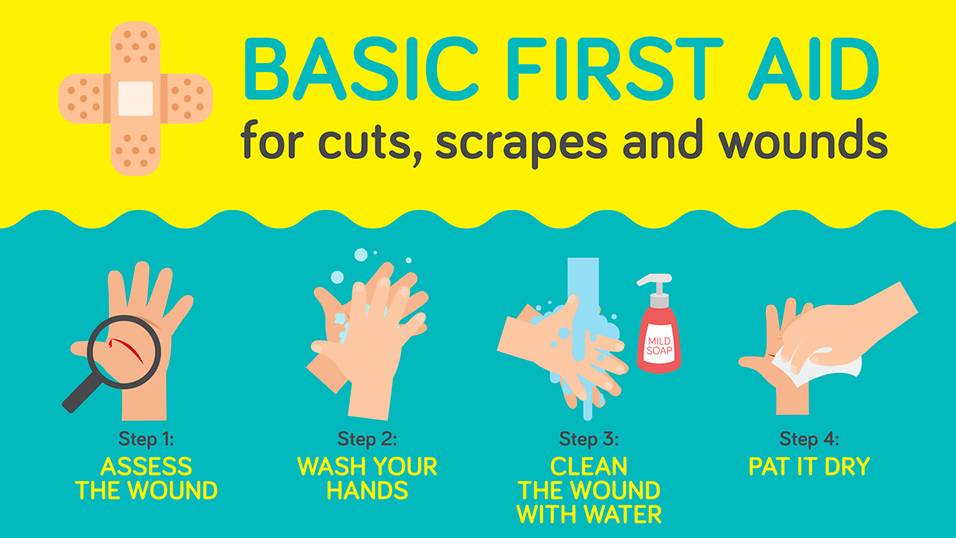

Infographic: Paulyn Ng
STEP 1: ASSESS THE WOUND
Check to see how deep the wound is and if the edges of the cut are widely separated. If it’s a deep cut and won’t stop bleeding for 10 or 15 minutes, even after you apply direct pressure, use a clean cloth or gauze to bandage it up. Take junior to the emergency room at once. If it’s not too serious, proceed with the next steps.
STEP 2: WASH YOUR HANDS
Since you’ll using your hands a lot, make sure to clean them first, so that the wound won’t get infected. Get someone to comfort your child as you do this or encourage them to take a seat and calm down.
STEP 3: CLEAN THE WOUND WITH WATER
Hold the wound under gentle running water at a temperature your tyke is comfortable with. Flush the wound for at least 90 seconds to ensure that you wash away any dirt, debris and bacteria. Scrub gently with water, mild soap and a washcloth. Scrub moderately if the wound is very dirty. If you’re not near a tap, use baby wipes or bottled water. Use a pair of tweezers (disinfect these first) to remove any stubborn debris.
STEP 4: PAT IT DRY
Use a clean cloth or paper towels to dry the area completely. If it’s still bleeding, apply pressure for five more minutes to give the blood enough time to clot. Still bleeding? Rush junior to the doctor.
STEP 5: APPLY A SOOTHING AGENT
This can be in the form of an antibiotic cream, vitamin E oil or aloe vera gel. Make sure you always have a tube at home and on the go ― it’s a must when you have kids! These will protect them any infection and help in the healing process.
STEP 6: COVER THE WOUND
Contrary to popular belief, allowing a wound to air dry doesn’t speed up the healing process. Instead, it not only slows it down, it may increase the chances of infection and scarring. Leaving it open will also encourage your curious little George to pick at his wound and aggravate it. So, a bandage or gauze to seal it, then fix a cute plaster of junior’s choosing on top. Keep it covered until the wound has closed.
STEP 7: CHECK IT REGULARLY
Keep a close eye on the wound every time you change the dressing ― which should ideally be three times a day ― and especially when it’s wet, dirty or worn out. Once it’s formed a scab, you can leave the area uncovered. If it doesn’t seem to be healing and you see signs of infection, consult your doctor at once.
Main photo: iStock
Like us on Facebook and check SmartParents regularly for the latest reads!
In case you missed these stories…
Could the food your kid eats be causing his bad behaviour?
At what age can my kid go out on her own?
Celeb kids who are carbon copies of their famous parents [Photo Gallery]